
Solar
Most MC4 connector troubleshooting guides list causes and fixes side by side, which is useful once you already know what’s wrong. This guide starts from the symptom instead, because that’s usually where an installer or system owner actually begins — something looks, feels, or measures wrong, and the cause isn’t obvious yet.
If you’re installing a new connector rather than diagnosing an existing one, our crimping guide covers correct installation from scratch. This MC4 connector troubleshooting guide picks up after the fact, when something in the field needs to be diagnosed on a system that’s already running.
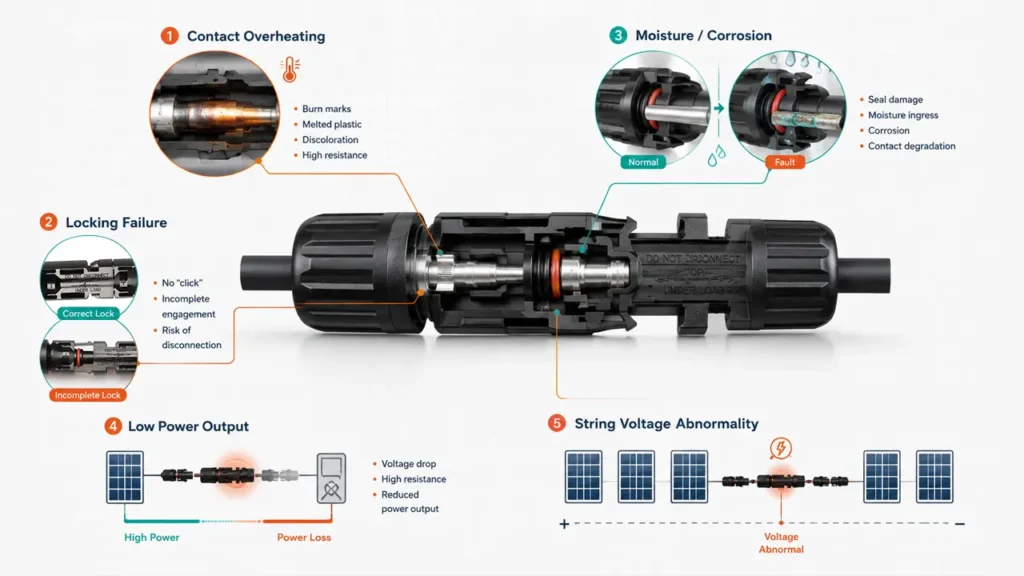
MC4 Connector Troubleshooting: Quick Symptom Reference
| Symptom | Most Likely Cause | First Check |
|---|---|---|
| Burn marks, melted plastic, discoloration | High resistance from a loose or poor crimp | Thermal scan under load |
| No audible click when mating | Worn locking clip or brand mismatch | Try mating with a known-good matching connector |
| Corrosion or moisture inside housing | Missing, damaged, or misaligned seal | Visual inspection of the rubber gasket |
| Power output lower than expected, connector looks fine | Voltage drop across a high-resistance connection | Load voltage-drop test |
| String voltage reads lower than the sum of module ratings | Open or intermittent connection somewhere in the string | Open-circuit voltage (Voc) test |
How to Actually Diagnose a Suspected MC4 Connector Fault
Before replacing anything, confirm what’s actually wrong. Guessing based on appearance alone misses the connections that look fine but are failing electrically.
Open-circuit voltage (Voc) test. With a CAT-rated multimeter, measure the string’s open-circuit voltage and compare it to the sum of the modules’ rated Voc. A reading significantly lower than expected points to an open or intermittent connection somewhere in the string.
Load voltage-drop test. Measure voltage across a single mated connector pair while the string is under normal operating current. A healthy connector should show close to zero drop. Any measurable voltage across the connector itself indicates resistance building up inside it — even if it looks physically fine from the outside.
Thermal scanning. An infrared camera under load will show a hot spot at a high-resistance connection well before it’s visible to the eye or causes a measurable output drop.
Insulation resistance testing. For more advanced cases, especially suspected moisture ingress, insulation resistance testing can identify faults that a simple continuity check would miss.
Symptom: Overheating or Burn Marks
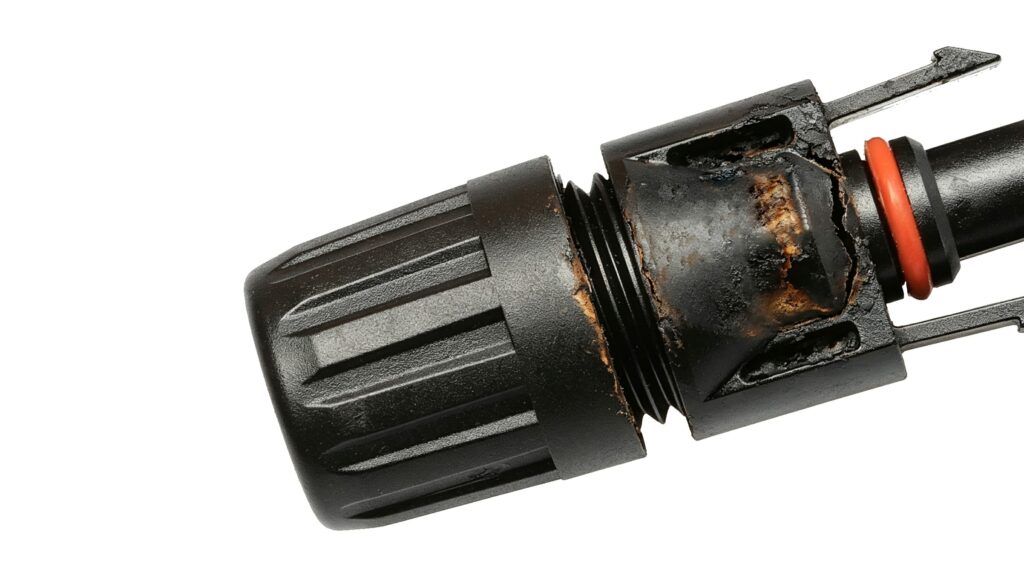
Discoloration, glossy melted spots, or soot around the connector body are signs of sustained high resistance — usually from a loose crimp, a cross-brand mismatch, or a cable sized too small for the actual current.
Don’t just re-tighten a connector showing burn marks and put it back in service. Heat damage changes the material properties of the housing and contacts even if it still “clicks” normally. Replace both mating halves and inspect the adjoining cable section for heat damage as well.
If undersized cable is a possible contributing factor, check it against our MC4 connector cable size guide before reinstalling.
Symptom: No Click or a Loose-Feeling Connection
A connector that won’t click, or clicks but still moves under a gentle tug, usually comes down to one of two causes: a worn or deformed locking clip from repeated mating cycles, or a mismatch between connector brands with slightly different clip geometry.
If the connector has been mated and unmated many times, clip wear is the more likely cause — repeated cycling is hard on the internal spring mechanism. If it’s a first-time connection between panels from different manufacturers, check our MC4 connector compatibility guide before forcing a connection that doesn’t seat cleanly.
Symptom: Water Ingress or Corrosion
Moisture or oxide residue inside the housing points to a compromised seal — a missing rubber gasket, a cap that wasn’t fully tightened to spec, or a seal damaged during a previous disconnection.
Cleaning corrosion off the contacts sometimes restores a temporary connection, but it doesn’t fix the underlying seal failure that let moisture in. If cleaning doesn’t restore bright, clean metal and a tight mechanical fit, replace the connector rather than reusing a compromised seal.
Symptom: Power Loss With No Visible Connector Damage
This is the failure mode that gets missed most often, because there’s nothing to see. A connector with early-stage resistance buildup can cause measurable power loss well before it looks or feels different from a healthy one.
This is exactly what the load voltage-drop test above is for. If a visual inspection turns up nothing but output is still lower than expected, test before assuming the connector isn’t the problem.
Preventing the Same Fault From Recurring
Fixing the immediate symptom is only half the job. If a connector overheated once, check whether the underlying cause was isolated to that one connection or affects the whole string.
A single loose crimp is usually a one-off installation error. But if you find heat damage on more than one connector in the same string, undersized cable across the whole run is a more likely root cause than several unrelated bad crimps — worth checking against our cable size guide before replacing connectors one at a time.
Similarly, if corrosion shows up on multiple connectors in the same general area, it points to an environmental factor — standing water at a low point in the conduit run, or a batch of connectors with a manufacturing seal defect — rather than several coincidental individual failures.
When to Repair vs. Replace
Re-crimping or re-tightening is appropriate for a connection that’s loose but shows no heat damage. Once there’s visible discoloration, melting, or corrosion that doesn’t clean up completely, replace rather than repair — the material and contact surfaces have already been compromised in ways a visual check won’t fully reveal.
FAQ
What’s the first step in MC4 connector troubleshooting? Confirm the symptom with a test rather than guessing from appearance — a Voc test for suspected open connections, a load voltage-drop test for suspected resistance, or a thermal scan for suspected overheating. See the diagnostic methods above for each.
Can a burnt MC4 connector be repaired instead of replaced? No. Heat damage changes the housing and contact material even if the connector still clicks normally. Replace both mating halves and check the adjoining cable for damage.
Why is my MC4 connector not clicking? Usually a worn locking clip from repeated mating cycles, or a mismatch between two different connector brands. Check our compatibility guide if it’s a first-time connection between different manufacturers’ panels.
How do I know if an MC4 connector has internal resistance without visible damage? Measure voltage across the mated pair while the string is under normal load. A healthy connector shows close to zero voltage drop; any measurable drop indicates resistance building up inside, even without visible signs.
Is water inside an MC4 connector always a sign it needs replacing? Not always — cleaning can restore a temporary connection. But if it doesn’t return the contacts to bright, clean metal with a tight seal, replace the connector rather than risk continued moisture ingress.
[1] Source: ExpertCE — How to Wire and Troubleshoot MC4 Solar Panel Connectors
Related reading: How to Crimp MC4 Connectors · MC4 Connector Compatibility: The Cross-Brand Mating Problem Explained · MC4 Connector Cable Size: A Sizing and Voltage Drop Guide · DC Arc Faults in Solar Systems